
Saturday, May 28, 2011
Forums now online
Monday, May 23, 2011
Meet us at the Makerfaire!
We had a really great time at the MakerFaire in San Mateo over of the wekeend. We were quite afraid of being a Scotch Botique (that's a store where no customers are ever seen), but we were completely wrong. Many of you came out to see us. We've never seen so many people or sold so many kits before. Thanks for everyone that came out, we'll be doing this again next year!

1,200 miles was a pretty long drive for the faire, but it was worth it to promote the site. Gave us a lot of time to think as well. We really need a forum, so we can chat about and get feedback about our kits. Look for that very soon.
I realize it's been a year since I blogged on this site, and I need to fix that. The original intention was to do a short write up on each new kit. We've been so busy trying to create the kits that we haven't been documenting properly. But again, the primary focus recently has just been to get projects to market. I'm happy to say that the web site is up to date (the latest project is just about a week old!). The writeups are pretty extensive in the instructions, and all kits are available from the store.
Tuesday, April 13, 2010
How to burn a project, soup to nuts....
Well, I wanted to burn my first project board, SMTCylon. How did I do it. This is the step by step of how it was done.
First, I was luck that Dale Wheat, creator of tinyCylon had posted his code and schematics in the public domain. All I needed to do do was build his circuit and work out the details:

Ok, now that I had a working model, just draw out the circuit as a surface mount version...

On, transparancy of course... Nicely squished between glass and the photo board. Here right before I removed the white protective film.

Then transfer that to a photo senstative board... Here a fresh CF (Compact Flourescent) Bulb, 15w, was placed 8" above the board for 8 minutes. Moving the board around seemed to help distributed the energy evenly over the board. Failure to do so left unexposed areas.

Next, develop the image in developer. Note: Developer must be EXACTLY 100 - 110 degrees. I've found best luck at 105 degrees F exactly. I nuke it up in the microwave and let it cool to 105. Measure with a thermometer and be sure... Do NOT expose to white light as I was doing here or you may lose the image. Depends on the frequency of the white light. I watched 5 boards melt til I realized what was happening.

After a few seconds the image should appear. DO NOT EXPOSE TO WHITE LIGHT. If the image does not appear and the board stays dark green, your developer is bad or or was too cold. The board is destroyed. (It could be reused if wiped, resurfaced, etc) If the board has an image, gently wipe with a sponge as there may be residue, this helps to dislodge it. Run the board under cold water to set the image. You may now turn on the lights.
You can now heat up your etchant. Again, I've been doing this in the microwave. I started with Ferric Oxide, but have since switched to Muratic-Oxide. It's a lot less messy, but equally as dangerous. (1 part muratic acid added to 2 parts hyrdrogen peroxide. Read that carefully. Always add acid. Add acide to peroxide, not the other way around.) I get the etchant to about 150f and drop in the board. Pictured below is Ferric Oxide which stains nasty nasty!
 Moving the board through the etchant seems to accelerate the process. In about an hour the board will be fully etched. In this case, the board was not fully exposed and there were some areas that would not full etch.

After the board is washed and dried it can typically be cut with a pair of tin sheers.

In my case, I was experimenting with a new circuit, so I test soldered the majority of the new board.

All that was missing was the CPU. As part of the design of the SMTBoards web site, I had decided that all CPUs from this site would come preprogrammed, and therefore I would not design in circuit programming into my boards. Ok, it's kinda cheating, but it does simplify the design.
But that also means inventing some new technology; An out of circuit programmer for an SMT chip. That's where the Tiny13ISP comes in. Here's the first of its kind, cut from the same board as the SMTCylon prototype:

And here's the first time a Tiny13 every phoned home on one of these:

All that was left to do was upload the program, solder in the chip, and see if it worked....

Turns out after talking to Dale a bit, I was a bit off on the timing. But that's another story....
First, I was luck that Dale Wheat, creator of tinyCylon had posted his code and schematics in the public domain. All I needed to do do was build his circuit and work out the details:

Ok, now that I had a working model, just draw out the circuit as a surface mount version...

On, transparancy of course... Nicely squished between glass and the photo board. Here right before I removed the white protective film.

Then transfer that to a photo senstative board... Here a fresh CF (Compact Flourescent) Bulb, 15w, was placed 8" above the board for 8 minutes. Moving the board around seemed to help distributed the energy evenly over the board. Failure to do so left unexposed areas.

Next, develop the image in developer. Note: Developer must be EXACTLY 100 - 110 degrees. I've found best luck at 105 degrees F exactly. I nuke it up in the microwave and let it cool to 105. Measure with a thermometer and be sure... Do NOT expose to white light as I was doing here or you may lose the image. Depends on the frequency of the white light. I watched 5 boards melt til I realized what was happening.

After a few seconds the image should appear. DO NOT EXPOSE TO WHITE LIGHT. If the image does not appear and the board stays dark green, your developer is bad or or was too cold. The board is destroyed. (It could be reused if wiped, resurfaced, etc) If the board has an image, gently wipe with a sponge as there may be residue, this helps to dislodge it. Run the board under cold water to set the image. You may now turn on the lights.
You can now heat up your etchant. Again, I've been doing this in the microwave. I started with Ferric Oxide, but have since switched to Muratic-Oxide. It's a lot less messy, but equally as dangerous. (1 part muratic acid added to 2 parts hyrdrogen peroxide. Read that carefully. Always add acid. Add acide to peroxide, not the other way around.) I get the etchant to about 150f and drop in the board. Pictured below is Ferric Oxide which stains nasty nasty!


After the board is washed and dried it can typically be cut with a pair of tin sheers.

In my case, I was experimenting with a new circuit, so I test soldered the majority of the new board.

All that was missing was the CPU. As part of the design of the SMTBoards web site, I had decided that all CPUs from this site would come preprogrammed, and therefore I would not design in circuit programming into my boards. Ok, it's kinda cheating, but it does simplify the design.
But that also means inventing some new technology; An out of circuit programmer for an SMT chip. That's where the Tiny13ISP comes in. Here's the first of its kind, cut from the same board as the SMTCylon prototype:

And here's the first time a Tiny13 every phoned home on one of these:

All that was left to do was upload the program, solder in the chip, and see if it worked....

Turns out after talking to Dale a bit, I was a bit off on the timing. But that's another story....
Tuesday, April 6, 2010
Modding SMTCylon
A couple of modifications to SMTCylon
First, the Badge Modification.
I know, I know, we don't need no stink'n badges.
But this is so simple, it's cool.

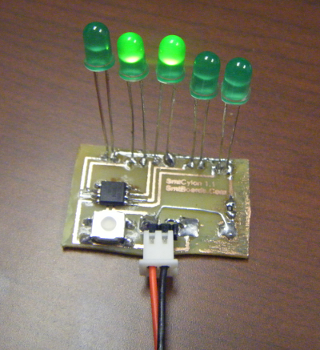
Next, I thought it would be cool to see if I could power the tiny board with a standard power supply and standard LEDs. No problem there...

And lastly, let's roll up all of my recent experiences into a new version, 1.3.

Just a tiny tiny bit cleaner in every way...
First, the Badge Modification.
I know, I know, we don't need no stink'n badges.
But this is so simple, it's cool.

Next, I thought it would be cool to see if I could power the tiny board with a standard power supply and standard LEDs. No problem there...
And lastly, let's roll up all of my recent experiences into a new version, 1.3.

Just a tiny tiny bit cleaner in every way...
Thursday, April 1, 2010
Beta Kits Landing!

Wohoo! We got our first boards in the hands of beta tester Dale Wheat,
Creator of the original tinyCylon on which SMTCylon is based.
Here's what he had to say:
"Fun! Thin! Would make a great badge - just needs a pin
glued to the back. It took about 20 minutes from start to finish."
Thanks Dale! And we found the right self sticky badge pins!
Kits, Plans, Instructions, and ordering all available from the kit page.


Wednesday, March 31, 2010
SMTTiny13ISP Project Completed
I completed the SMTTiny13ISP project and posted the project online. Kits and parts have been added to the shop.
The SMTTiny13ISP is the project is created to program all those Tiny13v/a SOIC chips I'm using in the SMTCylon project. Just as I promised, all CPUs from me are coming pre-programmed. This is the tool I use to do it.
 The circuit was just a bit too small and complicated for surface mount, so there are two jumper wires. Very ugly. Think I'm going to have to simplify those a bit i the next rev. But this is a great image of how to clamp and program a Tiny13 using the kit. A CPU is even included in the full kit!
The new packaging working out great, and looks good on this very simple kit. Drilling the holes for this kit is going to be a real pain in the tail. So, I'm charging a bit more for the board by itself. I set the kit price at a little under $5, including a blank CPU.

More details on the project page.
The SMTTiny13ISP is the project is created to program all those Tiny13v/a SOIC chips I'm using in the SMTCylon project. Just as I promised, all CPUs from me are coming pre-programmed. This is the tool I use to do it.

The new packaging working out great, and looks good on this very simple kit. Drilling the holes for this kit is going to be a real pain in the tail. So, I'm charging a bit more for the board by itself. I set the kit price at a little under $5, including a blank CPU.

More details on the project page.
Tuesday, March 30, 2010
Beta Kits Delivered
All the intial beta kits have been delivered save one, to Canda.
Still waiting on feedback from some of testers,
But initial feedback has been great.
Thanks for everyone that took the time to test this kit.
Version 1.3 of SMT Cylon corrects a lot of ills from the original 1.0 version. PMI calls this Progressive Elaboration, where the output from the previous step feeds the next.
Version 1.3 adds generous spacing vertically to the LEDs, as many of the testers noted it was too easy to overlap traces and leds. I also added dots to indicate pin 1 of the polarized devices. For the LEDs that's the positive node, for the CPU that's pin 1. The traces under the CPU were moved away from the pads, and the Positive nodes of the batter were connected. While I'm using a battery holder that performs this function, it doesn't hurt to duplicate the function on the board.

Subscribe to:
Posts (Atom)